In both cases, the root domain worked correctly, but adding SSL for both the root domain and the www version either failed completely or behaved inconsistently.
The Symptoms
Everything appeared to be configured correctly:
DNS Records
example.com      A       YOUR_SERVER_IP
www.example.com  CNAME   example.com
The root domain loaded successfully.
However:
SSL issuance would fail when including both domains.
The www version would not redirect correctly.
Let’s Encrypt validation would fail.
CloudPanel would sometimes refuse to issue certificates covering both names.
At first glance, it looks like a DNS issue, but in my experience, DNS was not the problem.
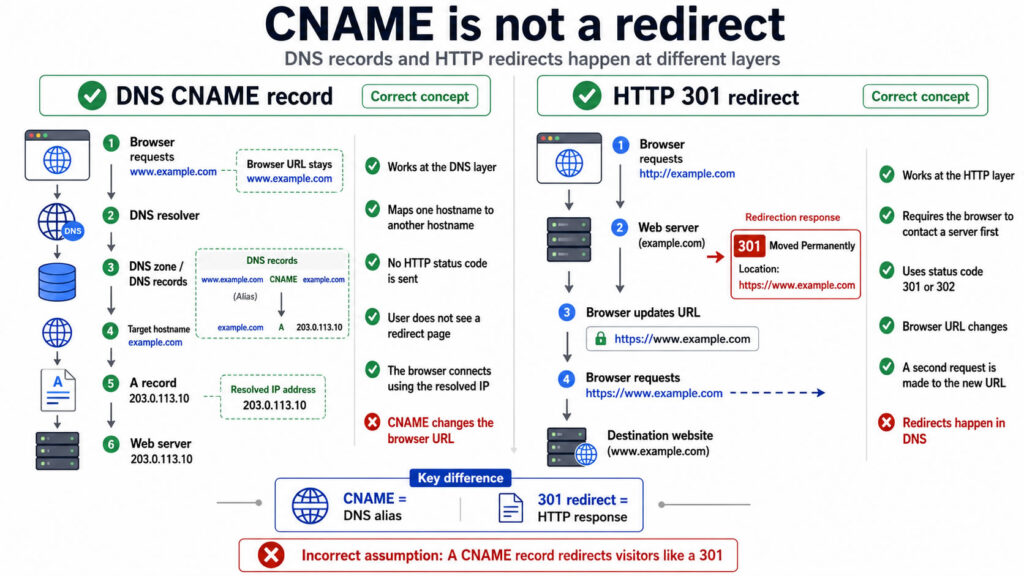
Why This Happens
Many people assume that because:
www.example.com → CNAME → example.com
the web server automatically knows what to do with requests for www.example.com.
It doesn’t.
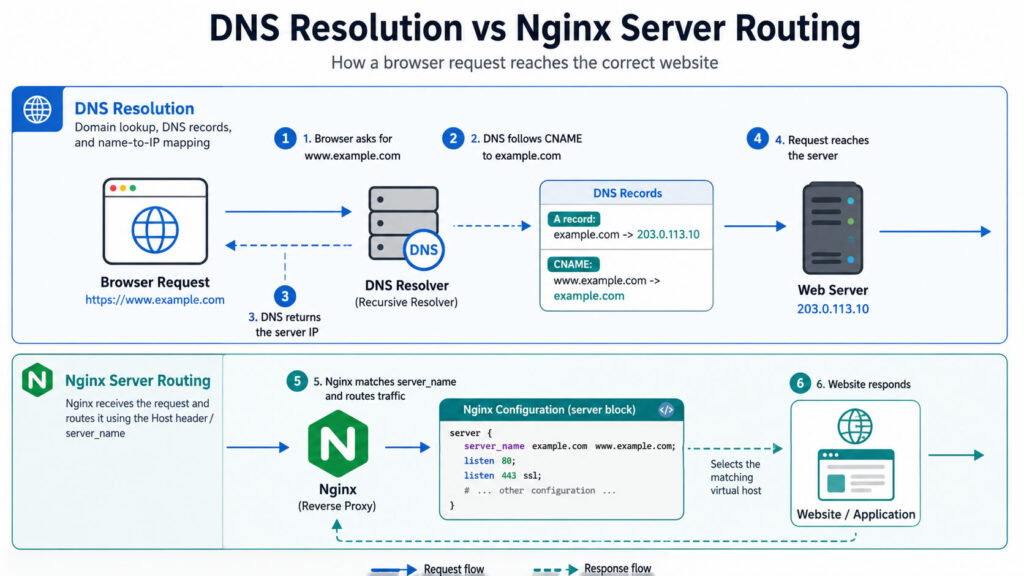
A CNAME only tells DNS where to send the request.
Once the request reaches your server, Nginx still needs a virtual host that explicitly handles:
www.example.com
If Nginx doesn’t have a matching server block, CloudPanel and Let’s Encrypt may not be able to validate the hostname properly.
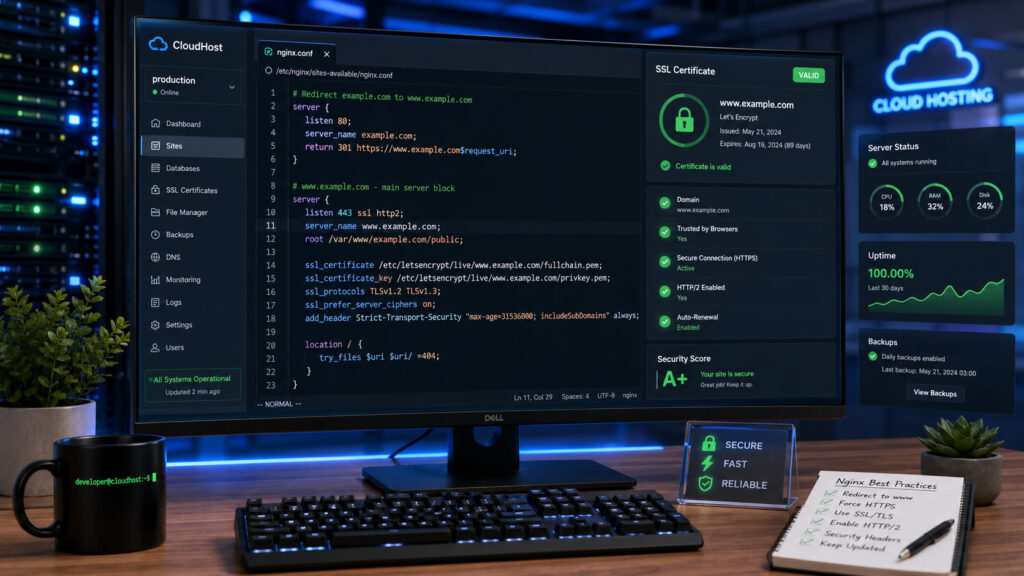
The Solution
Create a completely separate Nginx server block for the www hostname.
This is important:
Do NOT place this inside your existing CloudPanel vHost configuration.
Create a new standalone server block.
Example:
server {
    listen 80;
    server_name www.example.com;

    return 301 https://example.com$request_uri;
}
A common mistake is trying to add these lines inside the main vHost that already serves example.com.
That usually won’t solve the problem.
Example From My Working Configuration
For lawfirm.sabilaw.org I added:
server {
    listen 80;
    server_name www.lawfirm.sabilaw.org;

    return 301 https://lawfirm.sabilaw.org$request_uri;
}
Immediately:
www redirects started working.
SSL validation succeeded.
The certificate could properly cover both hostnames.
I experienced the same result on blazehumanizer.com after creating a dedicated server block for the www hostname.
Why This Fix Works
Let’s Encrypt validates each hostname separately.
Even though DNS points both names to the same server, Nginx must still know how to handle requests for:
example.com
and
www.example.com
By creating a dedicated server block, Nginx can properly answer validation requests and redirect visitors to the canonical domain.
SEO Benefits
This approach also improves SEO because all traffic is consolidated onto a single canonical domain.
For example:
www.example.com/page
becomes:
https://example.com/page
using a permanent 301 redirect.
This prevents duplicate-content issues and ensures search engines index only one version of your website.
If CloudPanel SSL installation keeps failing for both the root domain and the www domain, and your DNS records appear correct, check whether Nginx has a dedicated server block for the www hostname.
In my case, adding a standalone redirect server block solved:
SSL issuance failures
Let’s Encrypt validation problems
www redirect issues
Canonical domain SEO concerns
Sometimes the problem isn’t CloudPanel or DNS at all, it is simply that Nginx has no server block dedicated to handling the www hostname.
This guide will work over 92% times on all ubuntu/dembian server – with or without cloudpanel. If you are not using cloudpanel or any control panel, then you have to make sure you install REDIS
If you’re running a Laravel application on a CloudPanel server, setting up queue workers properly is one of those things you can’t afford to ignore. Background jobs—like sending emails, processing uploads, or handling payments—depend on a reliable queue system. And that’s where Supervisor comes in.
But here’s the mistake many beginners make: they jump straight into installing and configuring Supervisor without first checking what already exists. That’s how configurations get overwritten, workers conflict, and things quietly break.
Let’s walk through this the right way—from verification to setup, Redis configuration, and safe updates.
Step 1: Confirm if Supervisor Is Already Installed
Before doing anything, you need to confirm whether Supervisor is already installed on your server. CloudPanel environments are often reused or pre-configured, so don’t assume you’re starting from scratch.
Run this command:
which supervisord
If Supervisor is installed, you’ll see a path like:
/usr/bin/supervisord
If nothing shows up, it’s likely not installed.
Next, check the version:
supervisord --version
If you get a version number, you’re good. If you see “command not found,” it’s not installed.
Now check the service status (this is the most reliable check):
sudo systemctl status supervisor
If it says active (running) → Supervisor is already running
If it says inactive (dead) → It’s installed but not running
If it says Unit not found → Not installed at all
Finally, check if any queue workers already exist:
ls /etc/supervisor/conf.d/
If you see something like:
laravel-worker.conf
That means someone (maybe you) has already configured a worker. Don’t overwrite it blindly—inspect it first.
Also check running processes:
sudo supervisorctl status
If you see RUNNING, your queue workers are already active.
Here’s the truth: queues don’t fail loudly. They fail silently.
So you need to be disciplined about:
Checking Supervisor status
Watching logs
Restarting workers after changes
If you skip these, you’ll end up with jobs stuck in the queue and no clear error.
Start simple:
One worker
Redis queue
Basic logging
Then scale up as your app grows.
If you want to level up later, consider using Laravel Horizon. It gives you a dashboard, metrics, and better control over Redis queues—but only after you’ve mastered the basics above.
The stock image market has never been more accessible — and AI is the reason why.
Millions of buyers on platforms like Adobe Stock and Freepik download images every single day for websites, ads, social media, and marketing materials. What has changed is who can supply those images. You no longer need a camera, a studio, or years of photography training. With the right AI tools and a repeatable workflow, anyone with a laptop and an internet connection can produce professional-quality stock images at scale — and get paid for every download.
This guide covers the complete system: from generating your first AI image to automating uploads and projecting realistic monthly earnings. Whether you are brand new to this or have tried before without consistent results, this is the clearest path to building a passive income stream from AI-generated stock photography.
1. Choosing Your AI Image Generation Tool
Your tool choice will directly impact your output quality, speed, and profitability. There are three main options worth knowing about.
Midjourney (Recommended)
Midjourney is currently the best-in-class tool for generating stock-quality images. The Pro plan costs around $30 per month and includes 15 hours of fast generation plus unlimited relaxed generation. Using /relax mode, it is realistically possible to generate 500 to 1,000 images per day.
For anyone serious about building stock image income, Midjourney is the tool to use. It produces photorealistic results with relatively short prompts, which makes it highly efficient for a volume-based approach.
Feature
Details
Monthly Cost
~$30/month (Pro plan)
Daily Output
500–1,000 images using /relax mode
Image Quality
Best in class, photorealistic results
Ease of Use
Beginner friendly, short prompts work well
Best For
Anyone serious about stock image income
Clipdrop (Budget Option)
Clipdrop is powered by Stable Diffusion and costs around $9 per month. It includes an integrated upscaler, making it a solid two-in-one option for beginners on a tight budget. Image quality is lower than Midjourney, but you can test it for free before committing.
Google Colab (Free Option)
Google Colab lets you run Stable Diffusion for free in the cloud. The trade-offs are slower speeds, occasional disruptions, and more technical setup. This route is recommended only if budget is a genuine constraint or you already have experience with AI image tools.
Budget Tip: Start with one month of Midjourney ($30) plus Clipdrop for upscaling ($9). Generate aggressively in that first month. Once sales begin, upgrade to Topaz Gigapixel (one-time $99) for higher-volume upscaling. If even this is too much upfront, start with Clipdrop only and use the free Upscayl upscaler.
2. What Types of AI Images Actually Sell
Not all images perform equally in the stock market. The categories below represent the highest-demand image types on Adobe Stock and Freepik, verified by actual download data.
Photorealistic images of people consistently outperform abstract or illustrative content, particularly on Adobe Stock.
Top-Selling Image Categories
Lifestyle Photos — Everyday life scenes, genuine emotions, diverse representation. Used heavily in advertising, social media, and blogging.
Business and Work Themes — Offices, teamwork, remote work setups, technology in professional contexts.
Health and Wellness — Fitness, meditation, mental health, nutrition. Demand is growing with the wellness industry.
Nature and Landscapes — Broad appeal across travel, editorial, and decorative uses.
Food and Beverage — High-quality styled food photography. Constant demand from food bloggers, recipe sites, and restaurants.
Technology — Gadgets, software interfaces, AI concepts, cybersecurity visuals.
Medical and Healthcare — Doctors, equipment, health infographics, pharmaceutical imagery.
Abstract and Conceptual — Useful for representing ideas and emotions; popular for editorial and marketing use.
Seasonal and Holiday Themes — Christmas, New Year, Easter, Valentine’s Day, Ramadan, and more. Plan uploads 20–60 days ahead of each event to account for review times.
Realistic Mockups — Blank product designs like t-shirts, phone screens, and packaging. Highly sought after by designers.
Seasonal Opportunities Worth Planning For
New Year’s Eve, Chinese New Year, Valentine’s Day, Holi Festival, Easter, Cinco de Mayo, Ramadan, Eid ul-Fitr, Fourth of July, Thanksgiving, Hanukkah, and Día de los Muertos all generate predictable demand spikes. Get your content in the review queue early.
Key Insight: Images of photorealistic people performing jobs, hobbies, or daily activities generate the most downloads. These upload as “photos” on Adobe Stock and get reviewed faster than illustrations. Always prioritise photorealistic content in your production workflow.
3. How to Find Winning Image Ideas {#research}
The most reliable method for identifying what to generate is also the most overlooked: use Adobe Stock’s own download data.
Adobe Stock allows you to sort search results by number of downloads, effectively showing you the best-performing images for any keyword. This is one of the most powerful research tools available — and it’s completely free to use.
The Adobe Stock Research Method
Go to stock.adobe.com and search any keyword from your target category.
Click the Sort filter and select Downloads to rank by popularity.
Optionally filter to show AI-generated images only and sort by downloads to see specifically what AI content is selling.
Click on the top-performing images and copy their titles. These titles become your prompts.
Use these titles directly in Midjourney, or feed them into ChatGPT to expand into richer prompts.
Why This Works
Adobe Stock’s download data represents real buyer behaviour. When you sort by downloads, you are looking at images that buyers are actively purchasing. Generating your own version of a proven best-seller — without copying it — is the most direct path to making sales.
4. Writing Prompts That Generate Sellable Images {#prompts}
A prompt is the text instruction you give an AI image generator. The quality of your prompt directly affects the commercial value of the output. Fortunately, you do not need to become a prompt engineering expert to produce sellable images.
Method 1: The Direct Title Method (90% Success Rate)
Copy the title of a best-selling image from Adobe Stock and paste it directly into Midjourney. This works approximately 90% of the time and requires no additional prompt crafting. It is the most efficient approach for high-volume production.
Method 2: Add Style Keywords
When the direct title method produces results that are not quite right, add style-specific keywords:
For photorealistic images:
professional photoshoot, professional photography, natural lighting, shot, detailed, maximum details, sony a7R IV, photograph, natural skin
For illustrations:
illustration, digital art, 8k, hd, detailed, illustrator, procreate, vector
Method 3: ChatGPT Prompt Expansion
When a title alone does not yield good results, use ChatGPT to generate a richer description:
“Describe this [keyword/title] scene to a [photographer / illustrator / digital artist] in 3–4 sentences, focusing on adjectives.”
Reserve this method for situations where simpler approaches are not working — it adds time to your workflow.
The Prompt Decision Tree
Paste the Adobe Stock image title directly into Midjourney.
Poor result + photorealistic style needed → add photorealistic keywords.
Poor result + illustrative style needed → add illustration keywords.
Still poor → use ChatGPT to expand the prompt.
Still not working → move to the next title. Do not waste time.
5. Upscaling: Making Your Images Stock-Ready {#upscaling}
AI-generated images are typically not high enough resolution for stock site submission straight out of the generator. Most platforms require a minimum of 4 megapixels. Upscaling tools use machine learning to increase resolution while preserving detail and sharpness.
Important Rule: Never upscale more than 4x. Going beyond this threshold tends to introduce visible artifacts and reduce overall image quality.
Upscaling Tool Comparison
Tool
Cost
Best For
Clipdrop Upscaler
~$9/month
Beginners; included with Clipdrop plan
Upscayl
Free
Budget option; requires Vulkan-compatible GPU
Topaz Gigapixel AI
~$99 one-time
High-volume processing; best quality results
Recommended Progression
Start with Clipdrop Upscaler (included in the $9/month plan).
Use Upscayl for free if your computer has a Vulkan-compatible GPU.
Upgrade to Topaz Gigapixel when processing hundreds of images per day and earnings can cover the reinvestment.
PNG to JPEG Conversion
Most AI generators output PNG files. Most stock sites prefer JPEG. Before uploading, batch convert all upscaled PNG files to JPEG. A simple Python script using the Pillow library handles this in seconds for any volume of files. Run this conversion after upscaling and before the keywording step.
6. Where to Sell Your AI Images {#platforms}
While there are many stock platforms available, the data is clear: focus on two platforms that consistently outperform all others for AI-generated content.
Adobe Stock
Adobe Stock is the top earner for AI image contributors. Key facts for new accounts:
New accounts start with a review queue of approximately 50 images.
Review times currently range from 12 days to 1–2 months.
Your review queue grows as your sales rate improves — upload your best images first.
Average payout is approximately $0.33 to $3.00 per download.
Photorealistic images uploaded as “photos” are reviewed faster than illustrations.
Register at contributor.stock.adobe.com and read the AI content guidelines carefully before your first upload. Account bans for guideline violations are permanent.
Freepik
Freepik offers higher upload volume and faster review times, making it an excellent complement to Adobe Stock:
Upload up to 500 files at once initially; reach Level 3 for batches of up to 3,000.
Review times are approximately 3–20 days.
No hard limit on the number of images in the review queue.
Pay per download is lower ($0.04 to $0.06) but download volume is significantly higher.
Freepik earnings typically represent about one-third to one-half of Adobe Stock earnings.
Other platforms have been tested against this same workflow. Adobe Stock and Freepik consistently generate the most revenue relative to time invested. Other platforms tend to produce minimal results and are not worth the additional management overhead when starting out.
7. Automating Titles and Keywords {#automation}
Every image you upload requires a title and up to 50 relevant keywords. Done manually, this is one of the most time-consuming parts of the entire process. Done with AI automation, it costs approximately $0.80 to $1.20 per 1,000 images and runs in the background.
The Two Tools You Need
Everypixel (Keywording) Everypixel’s API analyses your images and returns relevant keywords. The free tier covers up to 100 images per day. Beyond that, the cost is $0.60 per 1,000 images. Register at labs.everypixel.com.
Replicate (Titles) Replicate provides AI-powered title generation at approximately $0.20 per 1,000 images. Create a free account using GitHub, set up billing with a ~$10 monthly limit, and generate an API token.
Cost Comparison
Method
Cost per 1,000 Images
Everypixel + Replicate (this system)
$0.80–$1.20
Typical SaaS keywording tools
$10–$30/month flat
How It Works
Once your images are upscaled and converted to JPEG, run them through the automation tool. It sends each image to both APIs, receives the generated title and keywords, and embeds them directly into the image file’s IPTC metadata. When you upload to a stock site, the title and keywords are read automatically from the file. Right-click any processed image → Properties → Details to verify the metadata before uploading.
8. The Full Production Workflow {#workflow}
This is the complete step-by-step process that ties everything together. Following this sequence consistently is what separates contributors who build meaningful income from those who upload sporadically.
Step
Action
1. Research
Pick a keyword. Search Adobe Stock. Sort by Downloads. Filter for AI images if desired.
2. Collect Titles
Click the top 13 images. Copy their titles into a list.
3. Generate Images
Paste titles into your Midjourney queue. While images generate, prepare your next 13 prompts.
4. Quality Check
Download completed images. Delete any with poor quality, incorrect anatomy, or visible defects.
5. Convert Format
Batch convert PNG files to JPEG.
6. Upscale
Run images through your upscaler. Maximum 4x. Check final resolution meets 4MP minimum.
7. Auto-Tag
Run the automation tool (Everypixel + Replicate) to embed titles and keywords into metadata.
8. Organise Files
Move tagged images into your folder structure.
9. Upload
Upload to Adobe Stock first (prioritise photorealistic images). Upload remainder to Freepik.
10. Repeat
Switch to the next keyword. Repeat the cycle.
Recommended Folder Structure
Keep your files organised from day one to avoid confusion as your library grows:
Tagged and Upscaled Images/
├── Adobe Stock Uploads/
│   ├── Not Uploaded/
│   └── Uploaded/
└── Freepik Uploads/
    ├── Not Uploaded/
    └── Uploaded/
9. Realistic Earnings Potential {#earnings}
The following projections are based on real contributor data and conservative assumptions. These numbers are genuinely achievable but are not guarantees — quality is the biggest variable.
Adding Freepik income (roughly one-third to one-half of Adobe earnings) brings the combined 6-month estimate to $1,500 to $2,100 per month. These figures assume 1–2 hours of daily workflow. Most images sell more than once, which compounds earnings over time as your library grows.
Important: Poor quality will significantly underperform these estimates. High-quality images that closely match what buyers are searching for will outperform them. Treat every upload as a quality decision.
10. Top 20 Best-Converting Keywords for 2026 {#keywords}
These keywords are drawn from real Adobe Stock performance data, ranked by AI image conversion rate — the percentage of AI images in a category that generate at least one download.
Use these as your starting research points on Adobe Stock, then find the specific top-downloaded images within each category.
Rank
Keyword
AI Conversion Rate
1
history war
18.79%
2
seoul
18.09%
3
fantasy castle
17.75%
4
led screen
17.65%
5
knight medieval
17.37%
6
pc gaming
17.40%
7
myth fantasy
16.71%
8
vip
16.96%
9
kingdom
16.79%
10
bible
16.61%
11
video game
16.46%
12
swords
16.44%
13
4×4 atv
16.43%
14
mythology
16.41%
15
gothic fantasy
16.28%
16
meditation mandala
16.06%
17
ww2
15.88%
18
fighter jet
15.76%
19
god
15.41%
20
warrior fantasy
15.29%
11. Tips, Tricks, and Common Mistakes to Avoid {#tips}
Do This
Upload consistently. Regular uploads positively affect your ranking in stock site search algorithms.
Prioritise quality at the start. A high early sales rate increases your review queue faster than large volumes of mediocre content.
Check faces, hands, and anatomy before uploading. AI-generated images frequently have defects in these areas that will get submissions rejected.
Put the most relevant keywords in the first five positions. Stock sites weight early keywords more heavily in search results.
Upload a variety of styles and themes. Do not upload more than 3–4 similar-looking images in the same batch.
Use the 3:2 aspect ratio as your default. 16:9 and 7:4 are also acceptable.
Read the platform guidelines regularly. Both Adobe Stock and Freepik update their AI content policies frequently.
Avoid This
Do not upload copyrighted material. This includes brand logos, car designs, perfume bottles, artworks by named artists, or images based on real people. Account bans are permanent.
Do not upload images with text in them. AI-generated text is almost always garbled and will get your submissions rejected.
Do not upload your first attempt. Generate multiple variations and select only the best quality outputs.
Do not spread yourself across many platforms early on. Master Adobe Stock and Freepik first before adding others.
Do not ignore the seasonal calendar. Missing a major holiday by uploading too late means waiting another year for that traffic spike.
Maximising Your Midjourney Subscription
If budget is a concern: subscribe for one month and generate as aggressively as possible using /relax mode — aim for 500 to 1,000 images per day. Build a library of several thousand quality images, then cancel your subscription. Upload and process that library over the following weeks. Resubscribe when you need to generate more content. This approach can cut your ongoing tool costs significantly during the early months.
Making money with AI-generated stock images is genuinely achievable in 2026. The contributors who succeed are not necessarily using the most sophisticated tools or the most elaborate prompts. They are the ones who show up consistently, maintain quality standards, and follow the workflow without shortcuts.
The keyword data in this guide is real. The workflow is proven. The earnings projections are based on actual contributor performance.
Start with one keyword. Find the top 13 images. Generate your first batch. Upload. Then repeat.
The market does not reward perfection. It rewards consistency.
Disclaimer: This guide is for educational purposes only. Individual results will vary based on image quality, upload consistency, and platform policy changes. Always read the current contributor guidelines on Adobe Stock and Freepik before uploading.


")